Showing posts with label Office 365. Show all posts
February 20, 2019

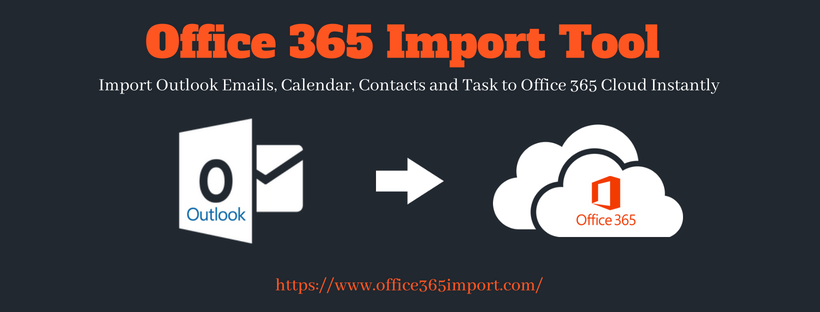
Office 365 Email Extractor Extracts Data from Office 365 | 2019 Trend


SysTools Office 365 Export is one of the best email extractor to extract Office 365 mailboxes data to various file types. It can even extract different components of Office 365 like emails, contacts, calendars, tasks etc. It supports all Microsoft Windows versions.

Today, we will be reviewing one of the agile software packages available to extract Office 365 mailboxes to different file formats, which is developed by SysTools. This reputed organization always aims to deliver result-oriented products to users. One such tool is Office 365 extractor which is developed keeping in mind the various limitations in manual solutions.

Overview of SysTools Office 365 Email Extractor

SysTools Office 365 Export tool is one of the top email extractor software developed by our best technocrats. It offers a wide range of features and functionalities to export all the data items from an Office 365 account to different file formats. It is capable enough to extract even the archive (In-place archive) mailbox items to different formats like PST, EML, and MSG. It is standalone software designed to extract different mailbox items such as emails, contacts, calendar, tasks, etc. With this Office 365 extractor, now users don’t have to worry about any loss of data.

Office 365 Extractor-Supported Plans

With the help of this O365 extractor tool, now it becomes easy for the users to export Office 365 data items and save them to the desired format. It is available in the following Office 365 plans,


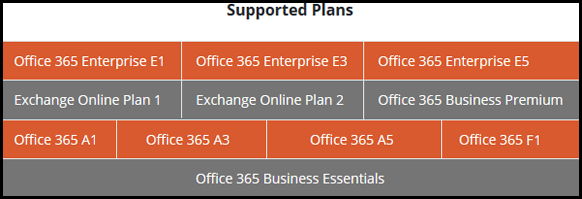
SysTools Office 365 Extractor Reviews by Experts

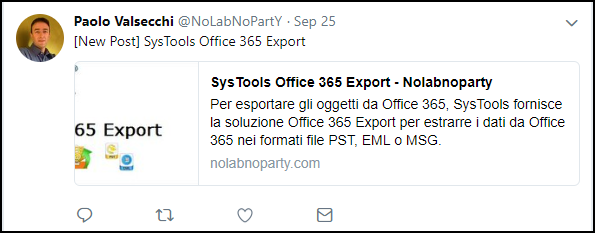
Paolo Valsecchi, Vmware Certified Professional-DCV recommends SysTools Office 365 export Tool by symbolizing it as a top-notch software to export Office 365 mailbox items within a short duration of time. In addition, this Office 365 extractor tool has the ability to export In-place archive data items in a seamless way.


Furthermore, this dynamic tool is suggested by many MVPs, which can efficiently perform the export process with all the data items which exist in an Office 365 profile.

Prominent Features Rendered by Office 365 Extractor Tool

  • Swiftly Extracts Office 365 Mailboxes
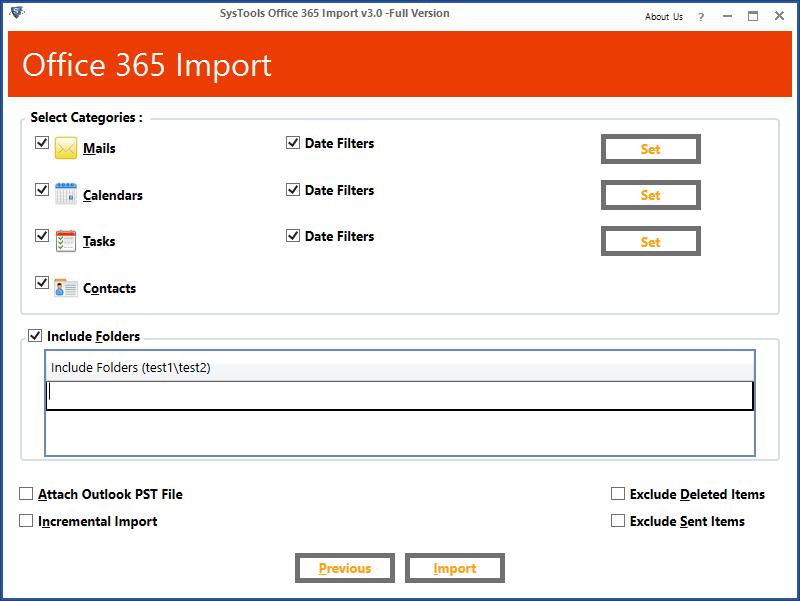
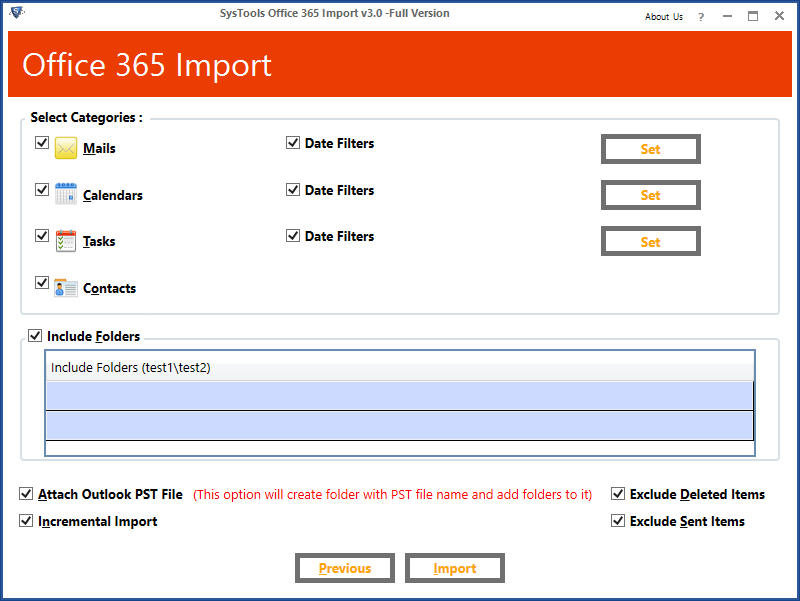
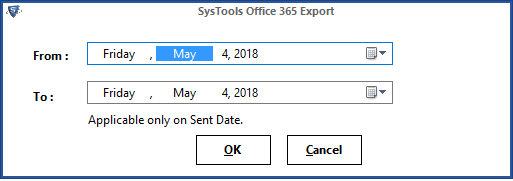
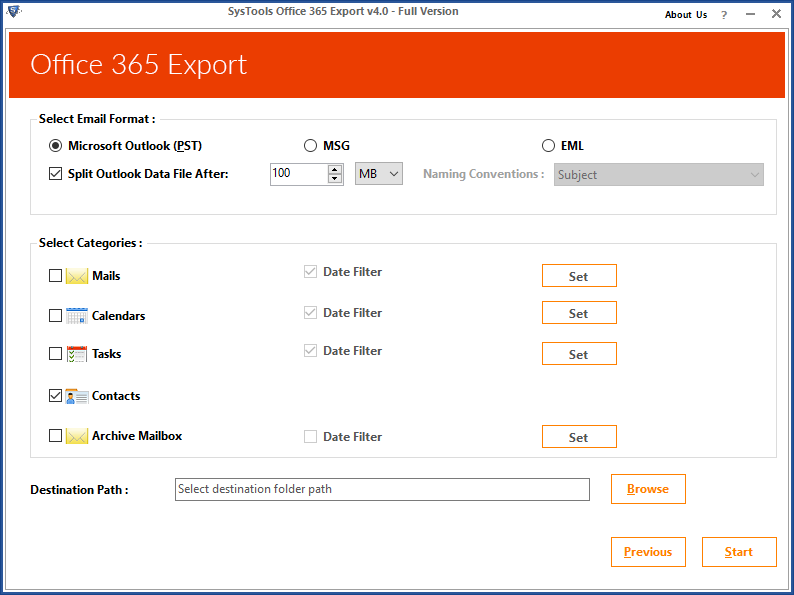
    This Office 365 extractor is designed with the intention to provide a simple and friendly interface to the user. Therefore, one can smoothly export all the data items such as emails, contacts, calendar, etc to multiple file formats. As a result, users can export the file to any of these formats such as PST, EML, and MSG.
  • Apply Date-filter Option to Export
    This Office 365 exporter tool renders so many impeccable features to export Office 365 mailbox items. For users who need to export selective emails within a set of date range can apply the Date-filter option. By this, a user can export the desired emails to different file formats, instead of exporting the entire emails.
  • Different Naming Convention Options
    With the help of this standalone application, users can export the files giving them the desired name from the given list of options. This can be achieved by selecting the desired naming format from the Naming Convention drop-down list. It offers a variety of naming conventions such as Subject, Subject_Date, Subject_From, Date_From_Subject, Date_Subject_From and many more
  • Facility to Pause & Resume the Export
    During the export process, due to poor internet bandwidth or if some other technical discrepancies occur. A user is allowed to opt the Pause button, after which the process can be continued using the Resume button. This added feature can be applied as many times as needed, according to the requirements of the user.
  • Option to Split Outlook PST File
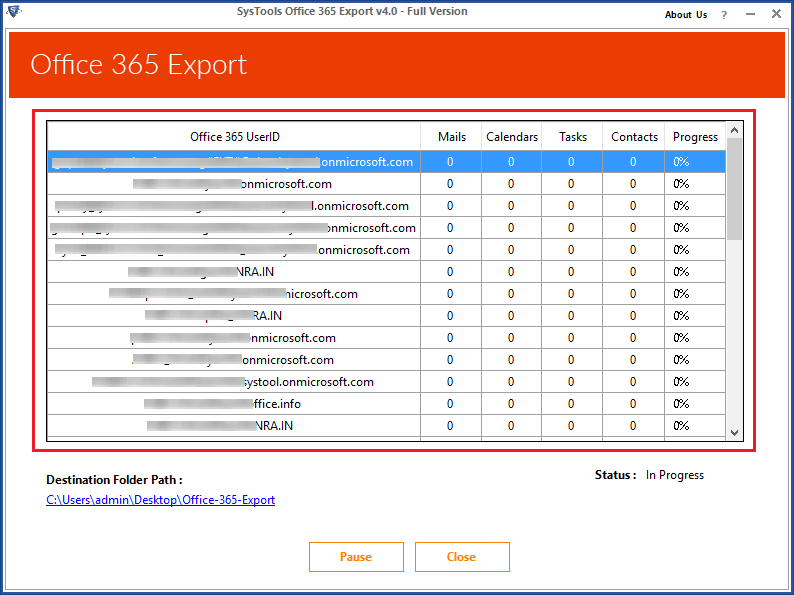
    The Office 365 extractor tool is designed with the advanced algorithms to tackle all kinds of issues while exporting O365 using the manual methods. With this dynamic tool, a user can split the resultant PST file by providing the size limit. This ensures users can extract all the emails in a hassle-free manner.
  • Saves Analysis Report
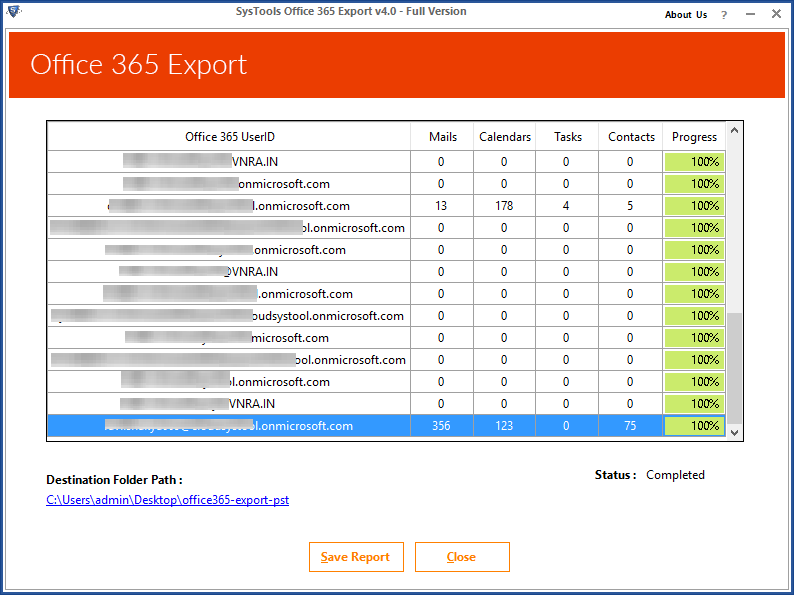
    While exporting Outlook 365 mailboxes to the desired file format, the Office 365 extractor tool simultaneously shows the status report. Upon successful completion of the export process, it generates a final report with the complete details of the export. It includes details such as user ID, calendar count, email count, contact and task count.

Freeware Version

The Office 365 extractor tool is available in Demo and Full version. The Demo version is cost-free, hence it imposes restrictions to its features. Although, it supports 100 emails to extract Office 365 email items. Therefore, users can avail themselves of this Demo version to check the instant working of the export process. Once satisfied with its result-oriented features, the users can purchase the Full version, which is available at all time at a reasonable rate. Click below to download the trial version:

Final Verdict

Many times users face serious issues such as data loss while exporting Office 365 mailbox items. Considering the various shortcomings in the manual methods, one can use SysTools Office 365 Export tool. It is a guaranteed solution to export Office 365 data items into multiple file formats. It renders a simple and easy-to-use interface. Along with that, it is powerful utility rendering cost-effective features. These exclusive and trustworthy features make the tool to deserve a rating of 9.8 out of 10.
January 15, 2019

Export Emails from Office 365 to PST Stepwise - How to Guide

Query: Are you trying to export emails from Office 365 to PST file format? Let's try Office 365 eDiscovery PST export tool to extract mailbox from Microsoft Office 365 online.

Microsoft Office 365 is one of the most popular cloud-based software as a service (SaaS) as well as the server (cloud) based emailing service that is used across the world. But, the people who are more concern about their data (like emails, contacts, calendars, etc.) which is stored on the server should save Office 365 mailboxes or emails locally. It is because, the data stored on the cloud is not 100% secure, there are high chances of data hacking. Therefore, the best solution for securing cloud data is to export emails from Office 365 to PST. With this export process, users will have the full access to Office 365 emails on the desktop. Even without the internet connection, O365 emails can be easily accessed. Therefore, considering all things, we have provided two simple solutions which can export mailbox from Office 365 to PST file format. So let’s learn it one by one.

Note: To export Office 365 emails to Outlook PST in a quick way, use Office 365 Exporter Tool.

Export Office 365 Emails Using eDiscovery Method

To know how to export mailbox from Office 365 to PST follow these simple steps:

  1. Firstly, log-in to the Exchange Admin Centre using Office 365 credentials.
  2. Now, navigate towards the Admin centre and click on Exchange.
  3. In the Exchange Admin center go to Permissions >> Admin Roles and then choose Discovery Management.
  4. Under the Exchange Admin center user has to add Mailbox Import Export role.
  5. After that click on Save button to export Office 365 email to PST.
  6. Go to Compliance Management and opt for in-place eDiscovery & hold and click on the New (+).
  7. Now, from the ‘In-Place eDiscovery & Hold’ dialogue box, type the name and description and click the Next button.
  8. Specify the criteria for all the mailboxes and select the ones by adding + button. That would be useful to export emails from Office 365 to PST.
  9. From the ‘Search query’ screen, set the appropriate filters and click the Next button.
  10. Now, from the ‘In-Place Hold Settings’ dialogue box, enter the number of days for which the items are to be kept before they are deleted from the server.
  11. Click the Finish button to export mailbox from Office 365 to PST.
  12. As the confirmation message appears to click the Close button.
  13. Now, all the generated search gets listed. After the completion of the process click the Preview & search results to view the results. Then, click the downward arrow to export PST files directly to PC.
  14. After that, run the security warning when asked to do so.
  15. From the ‘eDiscovery PST Export Tool’, set the destination location where the exported Outlook PST file will be saved. Hit, the start button & begin the process.
  16. Click the Close button after the completion of the process.
  17. Finally, Open Microsoft Outlook to access exported PST files in any of the existing profile.

Drawbacks of Manual Method

There are several limitations of using manual solution to export Office 365 emails into PST file format. Some of them are discussed below:

  1. Lengthy and time-consuming method
  2. Requires high technical knowledge

Alternative Solution to Export Office 365 Emails

As we have seen in the above section that manual method to export Office 365 emails is a very lengthy task. Therefore, it is recommended to use a professional solution i.e. Office 365 Export tool. It is simple and easy to use application that can extract Office 365 emails to PST in bulk. Any emails, contacts, calendars can be easily exported from Office 365 account in just a few clicks. Moreover, it provides the facility to transfer only selected folders & allows users to apply date filter also. It allows the migration from single as well as multiple users accounts all at a single time.

Steps to Export Emails from Office 365 to PST

  1. Launch the tool & click the Login button.
  2. Enter the credentials of Office 365 account.
  3. Now, the O365 accounts will be listed.
  4. Choose PST file format to export email from Exchange Online to PST.
  5. Select Emails & apply filters for exporting Office 365 emails into PST.
  6. Browse destination location to save PST file.
  7. A complete report is generated in CSV file format.

Conclusion

This blog post describes two solutions to export Office 365 emails to PST i.e. by eDiscovery & automated solution. But the manual procedure to export emails from Office 365 to PST is a quite lengthy process. Therefore, it is recommended to opt for third-party utility.

October 05, 2018

Office 365 Import PST Tool – 100% Migrate Outlook Data to Office 365

Office 365 Import PST Tool

Microsoft Office 365 is a cloud-based application, which is a secure place for data storage. Due to its various advance services many users prefer to use it. Also, it permits the user to access all sensitive documents, emails, contacts, etc., anywhere at any time. Apart from this, everyone wants to move their bulk PST emails to Office 365 account. But, this is a challenging task for users, therefore, it is not an easy to execute. Therefore, to resolve this issue, users can take help of an automated solution, i.e., Office 365 Import PST tool, which comprises of all the useful features. In this review page, we are going to discuss about this Migration tool in brief with all its features in detail.

Commendable Features of Office 365 Import PST Tool

  • Migrate Outlook Data to Office 365 Admin Account
    With this Office 365 PST migration tool, users can import PST files to Office 365 suite effortlessly. Also, it allows the user to move multiple PST files to O365 admin account or a user account as per the convenience. One just need to login to Office 365 profile by entering a valid password and username. The application will validate that account and permits to migrate PST to Office 365 account without any hassle.
  • Office 365 Admin Account
  • Offers 3 Options to Migrate Outlook PST to O365
    This software equips three different options like Add Files, Add Folder, and Add CSV while importing PST file into Office 365 Webmail. If the user will manually select and add PST files, then he/she will choose Add File(s) option. To import all PST files into Office 365 account, add each folder that contains multiple PST files in it, one can go for Add Folder option. Further, the user can upload CSV file consisting all details for each PST file.
  • 3 Options
  • Export Selective Data from PST File
    Office 365 PST Import tool renders option of selective data migration, instead of migrating complete Outlook mailbox to Office 365 user account. It allows the user to perform category-wise migration. Also, it is capable to import all PST items like calendars, contacts to Office 365 account without Outlook. Moreover, one can apply date-range filters to perform selective conversion from Outlook PST to O365 mailbox and save lots of time.
  • export Selective Data
  • Option to Attach Outlook PST Files
    It is a foremost utility, which focused on the internal folder hierarchy also. This Office 365 Import software helps to preserve orientation of all items and folders of a source file when migrating PST file to O365 account. If the user enables this option, it will generate a new folder in Office 365 Webmail with original name of PST and retains the original file structure. This will help to avoid any confusion in accessing data when moving PST files to Office 365 Online.
  • Attach Outlook PST file
  • Exclude Deleted / Sent Items Folder
    Another impressive feature of this Office 365 Migration tool is that it let users avoid conversion of unnecessary folders. Thereby, if the user does not want to import sent items or deleted items folder from Outlook PST to Office 365, then he/ she needs to verify this option and proceed. In addition, this Office 365 Import software will not include both of these folders during Import procedure.
  • Provide Option to Include Folder
    During migration process, this Office 365 Import tool will let users export a specific folder from Outlook PST file. To avail these services, one just needs to check Include Folder option and identify the required folder location like : "test/name/sample". In this condition "sample" folder inside the "test" only folder will become imported to O365 Webmail. This feature is also helpful if users want to perform customized migration.

Versions of Office 365 Migration Tool

The Office 365 Import tool is available in two editions i.e., Free and Licensed Version. As per the need, users can select any one of the two editions:

  • Free Edition: The Office 365 migration tool is available on company’s official website. One can download and install the setup of tool for understanding the overall working of product. However, there is a limitation of this version that it will import only 25 items per folder from PST to O365.
  • Licensed Edition: It is the full or licensed version of O365 PST Import, which allow the users to migrate multiple Outlook PST files to Office 365. There is no such constraint imposed in this version of the software therefore, one can buy this product from official site and, perform Outlook to Office 365 migration easily.

Working Steps of Office 365 Import PST Tool

  1. Launch Office 365 PST migration tool on your system.
  2. Then, enter all valid credentials i.e., Office 365 ID and Password.
  3. Choose Add File (s) or Add Folder to import all PST files into Office 365 Mailbox.
  4. Next, you can Add Username and Password for individual user Account. This option is valid if Admin Account cannot be impersonated.
  5. Once the PST file is browsed, choose File Categories and apply Date-wise Filter Options.
  6. Finally, the software will migrate Outlook data to Office 365 successfully.

Pros & Cons of Office 365 PST Import Tool

Pros

  • Allows to migrate one or more Outlook PST files to Office 365 account.
  • Option to perform incremental import from save PST after first attempt.
  • Offers Date-wise filter to migrate selective items from PST to O365 Suite.

Cons

  • Software does not support Mac operating system.

Observational Verdict

After understanding the pros and cons of the tool, we can wind up with the fact that Office 365 Import PST tool is an all-rounder solution. It is programmed in such a manner to migrate Outlook PST file to Office 365 account in bulk. Also, it has a simple and interactive interface that even a novice user can understand its layout easily. Thus, it can be rated as 9.8/10 because it will not support Mac operating system. Besides this, there is no other negative point of this application and I can proudly say that there could not be any other software like this.

September 03, 2018

How to Create Office 365 Email Signatures Centrally – Step by Step

How to Create Office 365 Email Signatures

An email signature plays an essential role in marketing, personal branding, and online visual identity. It can be considered as almost like a digital business card that is simple and small. The email signature conveys a professional image, serves as a free marketing tool for everyone you are connecting or responding, and makes it easier for others to get in contact with you. Today, most of the organizations and users are utilizing Office 365 and they want to append the digital signature in each email message to prove their authenticity. However, there are several users who do not know that how to create automatic signature in Office 365/ Exchange Online. In order to help users in performing such task easily, we have come up with this editorial. Here, we will disclose the manual technique of adding an automated email signature in Office 365. So, let’s begin.

Picture This Out!

Before proceeding further with the solution to create auto signatures centrally in Office 365, have a look at the following query. This query was asked by an Office 365 user who wants to create an email signature in Office 365.

“I want to add an email signature of few lines in the text format that is placed at the bottom of all the outgoing emails of my Office 365 account. This email signature will include my name, company, website, contact number and a short elevator pitch or you can say my favorite quote. So that, I can use this for sharing my essential contact information and advertise myself both. However, I do not have any idea about how to create auto signatures centrally in Office 365. So, is there any expert who can suggest a solution for the same?”

Guidelines to Set Up Auto Email Signature in Office 365

The Office 365 or Exchange Online is capable to automatically add text/ HTML or even image signatures. Below are the steps for this:

  • First, log in to office.com with your office365 account.
  • Next, click the dots/ App launcher icon on the top left corner and choose Admin option.
  • Click on Show more menu from the left sidebar.
  • Expand the Admin centers options and choose Exchange to navigate to the Exchange admin center.
  • Select mail flow and click on Add (+) icon, select Create a new rule.
  • In the ‘new rule’ dialog box:
  • Type a name for the new rule
    • Select Apply to all messages option in Apply this rule if… section
    • Select Append the disclaimer… in Do the following… option
    • Click on Select one… alternative and choose wrap option from the specifed fallback action wizard that prompts
  • Choose Enter text.. option and the key in your desired signature

  • Note: This field also supports the HTML tags so make sure to use of that
  • To verify the done procedure, send a test mail and check if it works

The Technical Challenge

As the in-built email signature editor is such a handy tool however, it includes some limitations. Such as:

  • You CANNOT place an email signature under the reply.
  • You CANNOT test the email signatures in advance.
  • You CANNOT prevent images from being blocked.
  • You CANNOT append side banners to messages.
  • You CANNOT see the signatures in Sent Items.
  • You CANNOT remove signaling phrases next to the empty Active Directory fields.
  • You CANNOT force email format to be available.

Concluding Lines

Signatures have radically developed and are being utilized by the whole of our civilization. This is a great way to personalize email messages or meet the regulatory compliances with all legal disclaimers. Thus, for users who are searching the solution for how to create auto signatures centrally in Office 365 / Exchange Online, this article provides a simple as well as an effective solution. Executing guidelines sequentially will enable automatic signatures on all the Outgoing emails in Office 365.

September 01, 2018

Why Should We Use OneDrive for Business – Top 11 Reasons

Use OneDrive for Business

Due to the adoption of cloud-based tools, people are working in a more effective and smart way. Organizations who are making use of Office 365 for their all business related chores, for them OneDrive for Business plays the most vital role. For both end users and cloud IT admins, OneDrive for Business is becoming one powerful solution as it offers additional capabilities to search for efficient ways to manage the big influx of data. Still, most of the users are unaware of the benefits related to OneDrive for Business. There are numerous capabilities that admin can implement or share with the end users to boost adoption and create power users. Therefore, in this blog, you will learn why to use OneDrive for Business. This will help the organizations to increase work productivity achha nhi lgg rha, alone feel and simplify the collaboration.

11 Reasons to Know Why Use OneDrive for Business

1. With OneDrive for Business Sync Tool Work Offline

With a cloud platform, the user can work from anywhere, on any device, at any time. But sometimes, the user does not have Internet access. Still, OneDrive allows the users to work offline. It offers a tool which helps the user to prevent the user’s Wi-Fi issues.

To work offline the user needs to download the OneDrive for Business sync app. Then he/she has to sign into Office 365 to navigate to OneDrive. Then the user has to search the library which he/she need to access offline and then press sync. The OneDrive for Business library allows the user to sync up to 20,000 files and folders.

The user can also pause or stop OneDrive for Business from syncing when he/she is having low bandwidth issues or accidentally began syncing process.

2. Gain Insight into Your Organization using Office Delve

Office Delve is the Microsoft’s new product, which allows the user to see what his/her colleagues are working on across Office 365. Delve integrates with the OneDrive so that the user can search and share documents with instant results. It acts as a project management tool and social media network all combined into one simple package.

Basically, Office Delve is powered by a technology called as Office Graph. It maps the relationships between people and content according to the Microsoft. Delve has a card-based interface which looks a lot like Pinterest. Each card is made up of documents and informational bites such as comments, likes, views, and tags which shows why and how each card is important. Cards are dynamic due to which the users are able to click and edit immediately. Moreover, one can also comment when the document is launched in Office 365.

3. Save Attachments Directly From Email to One Drive for Business

Many Office users spend much of their workday in sending and receiving files through Outlook. This is the benefit of the integrated file sync and share solution. It allows the user to connect to the applications that the user use most often such as Outlook.

The user can save the file attachments directly in OneDrive for the Business folder using Outlook Web App. Now, to save all the documents in an email, the user has to select Save to OneDrive or Save all to OneDrive. This will save the user documents to OneDrive folder called as Email Attachments. After that, you can easily move from folder to another folder within OneDrive or sent as cloud attachments.

To save a single attachment click on the down arrow and then select Save to OneDrive...BetterCloud

4. Check Out Your OneDrive for Business Storage Space

Now, the user can easily store a large amount of data in Office 365 as Microsoft has increased the cloud storage space available to Office 365 business subscribers from 25 GB to a full terabyte.

To check how much storage space is available to you, navigate to your Site settings page in One Drive for Business and then select Storage Metrics. Now, you will be able to see the allotted space remaining in the bar present in the upper right corner.

5. Enabling and Using Version Control

To stay up to date with the latest changes that are made by the user or his/her colleagues in the documents, Version Control is the best way.

To make use of Version Control, make sure that you are having version history enables in OneDrive for Business. To check it, select any file in the library and then click on Files > Version History. If this option is grayed out then you may need to contact your organization’s administrator to enable it.

Moreover, the Admins can also enable or remove version control from the complete list or the library. Version control settings can be configured to save a new version every time editing is done, depending on the importance of the document.

Once the user has enabled the version control, he/she can view, restore, or delete an earlier version of the document.

6. Configure Links to OneDrive for Business in Your SharePoint

Admins whose organizations are using both SharePoint 2010 and OneDrive for Business this option is good for them. As an admin, the user can set up a link that appears in his/her organization’s SharePoint. This will send users directly to their OneDrive for Business account.

After configuring links to OneDrive for Business in your SharePoint, it will become easy for the end users to navigate from SharePoint to OneDrive for Business.

7. OneDrive for Business on Your Mobile Device

Now, the organizations that use OneDrive for Business can access it on Windows Phone, Android and Apple devices. These apps are designed for ongoing working thus, they are not as efficient and powerful as their web-based or desktop counterparts. However, they have some inherent capabilities which are beneficial on these devices.

With Android devices, the user can pin folders to the home screen for quick access. For this, the user first has to download the OneDrive app on the Android device. After that, tap and hold on a blank space of the home screen and then select OneDrive. Now, he/she will be prompted to select a folder to pin it to your home screen. For enhanced security while accessing OneDrive account set up a PIN or use iOS TouchID.

8. Create and Host an Online Survey

The user can also create a survey with Excel Online, this helps the user to poll a group of friends on various things such as vacation destination preferences etc.

  • In OneDrive: Click Create > Excel Survey
  • In OneDrive for Business: Click New > Excel Survey

Note: Only personal OneDrive users can follow the next three tips. These tips are not available in OneDrive for Business.

9. Access your Other PC’s through OneDrive

Cloud allows the user to access the documents from anywhere, but OneDrive for Windows permits the user to access their other PCs. Even if the files are not in the user’s OneDrive folders then also he/she can access his/her PC’s through OneDrive. To access documents on other PC’s, the user needs to enable the Fetch Files feature.

10. Embed an Office Document in a Webpage

Would you like to share your PowerPoint or Word document with the readers? No issues, you can take advantage of OneDrive which allows the user to embed documents directly on his/her website or blog. The user just has to check the box next to the name of the document which you want to embed. After that, right click and select the Embed option. Now, select Generate to generate the HTML code. The user can use this HTML code to embed the document into his/her site.

11. Use IFTTT for OneDrive

If This Then That or IFTTT is a tool that automates tasks in the user’s everyday life. The user can connect to IFTTT to OneDrive and make multiple tasks easier.

  • Upload all the new iOS photos to OneDrive
  • Archive incoming attachments from Gmail to OneDrive
  • Upload all new Flickr photos the user post to OneDrive

Summing Up

There are numerous organizations that are migrating to Office 365, OneDrive for Business as it is important for the end users and admin. OneDrive for Business offers various management capabilities. To improve the collaboration and productivity, it is necessary for the admin to take full advantages of it. Thus, in the above section, we have explained different OneDrive for Business tips that will help the users to boost adoption and create power users.

April 20, 2018

Why Office 365 Backup Playing an Important Role Nowadays - Top 5 Reason

Microsoft Office 365 is the most discussed topic in both technology and business worlds. With the help of Office 365, users can work online, share files and spreadsheets. It is the perfect business cloud which allows users to work anywhere, anytime & on any device. But, due to its flexibility, the chances of data corruption or loss in the Office 365 is more. So, for recovery of lost or corrupted data, backup of Office 365 is necessary. Here, we will also discuss that why Office 365 backup plays an important role with top 5 reasons.

Why do I Need to Backup Office 365?

There are many reasons behind creating backup of Office 365 data. But, in this section, you will come to know the top 5 reasons to backup Office 365.

  1. Office 365 is an Ecosystem in the Cloud
  2. Office 365 is a complete ecosystem of many applications & data structures that are stored in the cloud. So, users don’t know exactly where is their data. Thus, If they didn’t have back up of data, then it is very difficult to find any data from the Office 365 ecosystem in the cloud. However, the backup is the only way to restore and find all of Office 365 data. Backing up Office 365 data is not an easy task and sometimes it is nearly impossible to do with the native Office 365 backup tools.

  3. MS Outlook Doesn’t Backup After 30 days
  4. Microsoft Outlook does not allow to take backup data older than 30 days that have been deleted from the recycle bin. Also, Outlook has limited email storage, so, sometimes users forced to delete some old emails. If end-users delete their old message to free the space, then it may possible the potentially destroying records that may be needed for legal or regulatory compliance. In such case, the backup should be necessary.

  5. Data Loss due to Ransomware Attack
  6. In this new world of hackers and data hostage viruses, data loss or corruption is a very common issue. There are many organizations that have faced the ransomware attack that literally took down their business. According to a recent research in 2017, there are more than 300,000 systems were taken down by Wanna Cry ransomware only. The only way to protect the firms from a ransomware attack is having a full and complete backup of Office 365 data.

  7. Business Continuity doesn’t Keep Safe the Data
  8. You should ensure that your business continuity is having full and accurate records of your data. The organization cannot exist large amounts of data that are creating, capturing, storing, and using every day. Therefore, data backup and archiving process are the good insurance policy against the risk of business data loss. Because the out-of-the-box tools of Office 365 cannot provide full and complete records in case of data loss.

  9. Regulated Industries have Stricter Backup Regulations
  10. If an organization comes under the regulated industry like Finance, Healthcare or Legal. Then, users may have regulations & requirements for access the information that goes well beyond regular backup methods. There are some regulations like HIPPA, GDPR, Can-Spam often require to maintain complete & accurate records of email, attachments, files etc from several years. However, Office 365 backup process is limited time backup, so it doesn’t provide a guarantee to complete backup with the out-of-the-box tools that come with Office 365.

Summing Up

In this write-up, we have discussed that why Office 365 backup plays an important role nowadays with top 5 reasons. However, it is known that data is not safe in the cloud. But, protection and security of Office 365 data are necessary and it is your responsibility to secure the corporate data. So, a user needs the same level of protection, administration, and security for MS Office 365 that is on the premises. In such scenario, the Office 365 Export tool is the best solution is to create Office 365 backup. It is a quick, simple and effective remedy to create backup of Office 365 data.

April 17, 2018

How to Fix eDiscovery PST Export Tool Stuck Calculating Error

An eDiscovery tool is used to export Office 365 mailboxes to the Outlook PST file in the Exchange Admin Center (EAC). The search results consist all the components from the Office 365 mailboxes. It completely depends on the sources of the content from the eDiscovery search. These Office 365 mailbox items can be sent to other people also within the same organization. But, sometimes a user faces an error eDiscovery PST export tool stuck calculating while running migration of PST file in Office 365. eDiscovery PST export tool failed to retrieve search configuration. Hence, in this write up, we will tell you the method to resolve the issue when eDiscovery PST export tool sticks in calculating state.

What Are The Symptoms Of This Problem?

There are some situations given where the eDiscovery PST export tool sticks in calculating state:

  • When a user is running Microsoft Exchange Server 2013 in an Office 365 Dedicated/ITAR environment.
  • If a person is the member of the SSA-Discovery Management baseline role group or of a custom role group that uses the SSA_Mailbox Search management role.
  • When a user is trying to perform a PST migration by using the eDiscovery PST Export Tool.

When you enter your credentials and you get a scenario like this, then surely the tool is stuck in a calculating state.

What Are The Main Causes Of This Problem?

There are many reasons behind the eDiscovery PST export tool sticks in calculating state error message. If the below mentioned following conditions are true, then it may the tool is stuck in a calculating state.

  • When the External Exchange Web Service (EWS) access is disabled in the environment.
  • If a user tries to start the PST migration process over the Internet.

How to Resolve eDiscovery PST Export Tool Issue?

To resolve the error eDiscovery PST export tool stuck calculating issue, it is the best to use Office 365 Export PST tool or Office 365 Exporter. This software allows users to easily migrate selective or entire data from Office 365 mailbox to Outlook PST without any data loss. By using this tool, a user never sticks to a calculating state. Moreover, this utility also provides many facilities like multiple naming convention options, move multiple Office 365 accounts to PST at once, apply date filter, etc. It also compatible to work with all versions of Microsoft Windows.

April 17, 2018

Learn How to Use eDiscovery in Office 365 (O365) - 5 Easy Steps


Are you willing to know how to use Office 365 eDiscovery? eDiscovery or Electronic Discovery is a platform that is used to locate, collect, and produce “Electronically Stored Information” (ESI) for legal purposes. Items like emails, voicemails, databases, documents, presentations, audio/video files, social media, and websites are considered as ESI. However, in-place eDiscovery of Office 365 can also be used for identifying, searching and exporting O365 mailboxes. In order to use Office 365 eDiscovery, users need to be aware of the complete procedure. Here we will learn the method to run Office 365 eDiscovery with step-by-step description.

How to Use Office 365 eDiscovery

In-Place eDiscovery is situated in Exchange admin center of Office 365. Follow these steps to use eDiscovery in O365.

1. Assigning Users Permissions for Security & Compliance for eDiscovery

Users have to be assigned to the roles in Security & Compliance Center in order to perform any eDiscovery tasks. There are two role groups in eDiscovery, called ‘Reviewer’ and ‘eDiscovery Manager.’

  • Reviewer: In this restrictive role group, members are only permitted to open and view eDiscovery cases of Security & Compliance Center. They are not permitted to perform any other task like creating searches or adding members. However, the members do have access to Advanced eDiscovery cases for performing analysis tasks.
  • eDiscovery Manager: This role group allows its members to create and edit searches, add and remove people to a case, export content search results, etc. It also lets users create search results in Advanced eDiscovery for analysis.

Allow Permissions to Access Permissions Menu of Security & Compliance Center

  • First of all, select the permission of your choice and click Edit icon to modify the option. On the next page, click on + icon to add users to ‘Administrator role’ and ‘eDiscovery Manager.’
  • Repeat this process to add Reviewers, but select to edit ‘Review role group.’ Now the permissions are set and assigned users can execute different eDiscovery Center tasks.

2. Creating an eDiscovery Case

  • Users have to access Security & Compliance Center to create a new case in eDiscovery. Then click on Search & investigation>> eDiscovery, and then click on + Create a case button.
  • In the right panel, boxes will appear where you have to enter case name and description of the case. Click Save.
  • A new case has been created. It will be displayed on the main page of eDiscovery.

3. Adding Members to the eDiscovery Case

On next step, members have to added to the case. Only members of role groups ‘Reviewer’ or ‘eDiscovery Manager’ can be added as the case members.

  • Go to Security & Compliance Center. Click on Search & investigation >> eDiscovery. All cases of your organization will be displayed.
  • Click on the case name where you want to add members. ‘Manage this case’ page will appear. Click on + Add button to add members.
  • Select users from eDiscovery Managers list and click on Add button.
  • After successful addition, confirmation notice will appear on screen.

4. Placing Legal Hold on Existing Content

Using eDiscovery case, users can place hold on certain contents to preserve it. Users can put hold upon mailboxes, group mailboxes, OneDrive for Business sites, SharePoint sites and sites associated with Microsoft. Once hold is placed on content location, that content will remain there until you remove the hold or delete the hold from that location. There are options for placing hold that determines the scope of hold:

  • You can place either infinite hold or query-based hold. The infinite hold is placed on all contents while query-based hold is placed only on contents that match a particular search query.
  • Hold can be placed within a specific date range when the contents were created, sent, or received. Otherwise, you can place hold on all contents.

Adding Hold on Contents

  • Navigate to Security & Compliance Center and click on Search & investigation >> eDiscovery to get the list of cases. Click Open button beside the case that you want to place hold upon. Click Hold tab from Menu of the case homepage.
  • Click on + icon to create a new Hold page.
  • Give a name for the hold that is unique to your organization.
  • Now, choose the location where the hold will be placed. The location can be a mailbox, sites, and even public folders. To add SharePoint, click on + button, then enter the URL you want to place hold on and finally click Add.
  • Click Next after addition is done.
  • If you want to create a query-based hold, enter values that you want to search in the box. Or else, leave it blank to put hold on all contents.
  • Extra conditions can be added to narrow down the results.
  • After configuring, click Finish to generate the query-based hold. It takes some time for this process to get completed.
  • You can see the detailed information of the new hold created in the right pane of the Hold page of that particular hold. These information will give you complete idea about how much eDiscovery case content is put on hold.
  • Users can also click on Update statistics to learn the latest hold statistics. They can also click Refresh to update these statistics in the detailed pane.

5. Creating and Running Content Search

After performing these steps, users can create and run searches for contents related to the case. Case Content Searches can be accessed only by users who are members of both the eDiscovery Manager role group and the case.

  • Go to Security & Compliance Center, click Search & investigation >> eDiscovery. Find out in which case you want to create a Content Search and click Open. Wait till the case loads and select Search.
  • Click + button to load a search window. Enter a name for the search.
  • Choose from these options to select your search location. You can choose the first option if you want to search contents put on hold. To search other places like mailboxes, choose Search everywhere or Custom location selection options.
  • If you select Search everywhere option, also select all options that will appear under it.
  • If you select Custom location selection option, choose your preferred location from the list of options.
  • After location selection is done, click Next. Enter conditions and keywords to generate a search query. Users can use Sensitive Type syntax here.
  • Users can also add similar conditions that were used while putting hold on content. Save the search to make it run.
  • Once the search is done, its results can be exported. Mailbox items get downloaded in PST format or as individual messages. SharePoint and OneDrive for business contents get exported as native Office documents and also other documents.

Conclusion

We have learned how to use Office 365 eDiscovery from this post. These are the basic steps to perform some elementary tasks using eDiscovery in Office 365. Apart from these, there are many other tasks that can be performed using this platform. However, users need to have in-depth knowledge to perform advanced level eDiscovery tasks. eDiscovery helps to protect documents that are important for litigation from being edited or deleted. The usage of Office 365 eDiscovery in the court of law will prove to be more beneficial in coming days.