Showing posts with label Cloud. Show all posts
October 05, 2018

Office 365 Import PST Tool – 100% Migrate Outlook Data to Office 365

Office 365 Import PST Tool

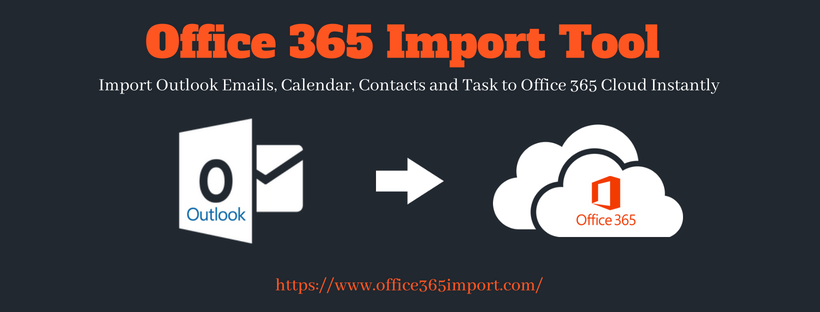
Microsoft Office 365 is a cloud-based application, which is a secure place for data storage. Due to its various advance services many users prefer to use it. Also, it permits the user to access all sensitive documents, emails, contacts, etc., anywhere at any time. Apart from this, everyone wants to move their bulk PST emails to Office 365 account. But, this is a challenging task for users, therefore, it is not an easy to execute. Therefore, to resolve this issue, users can take help of an automated solution, i.e., Office 365 Import PST tool, which comprises of all the useful features. In this review page, we are going to discuss about this Migration tool in brief with all its features in detail.

Commendable Features of Office 365 Import PST Tool

  • Migrate Outlook Data to Office 365 Admin Account
    With this Office 365 PST migration tool, users can import PST files to Office 365 suite effortlessly. Also, it allows the user to move multiple PST files to O365 admin account or a user account as per the convenience. One just need to login to Office 365 profile by entering a valid password and username. The application will validate that account and permits to migrate PST to Office 365 account without any hassle.
  • Office 365 Admin Account
  • Offers 3 Options to Migrate Outlook PST to O365
    This software equips three different options like Add Files, Add Folder, and Add CSV while importing PST file into Office 365 Webmail. If the user will manually select and add PST files, then he/she will choose Add File(s) option. To import all PST files into Office 365 account, add each folder that contains multiple PST files in it, one can go for Add Folder option. Further, the user can upload CSV file consisting all details for each PST file.
  • 3 Options
  • Export Selective Data from PST File
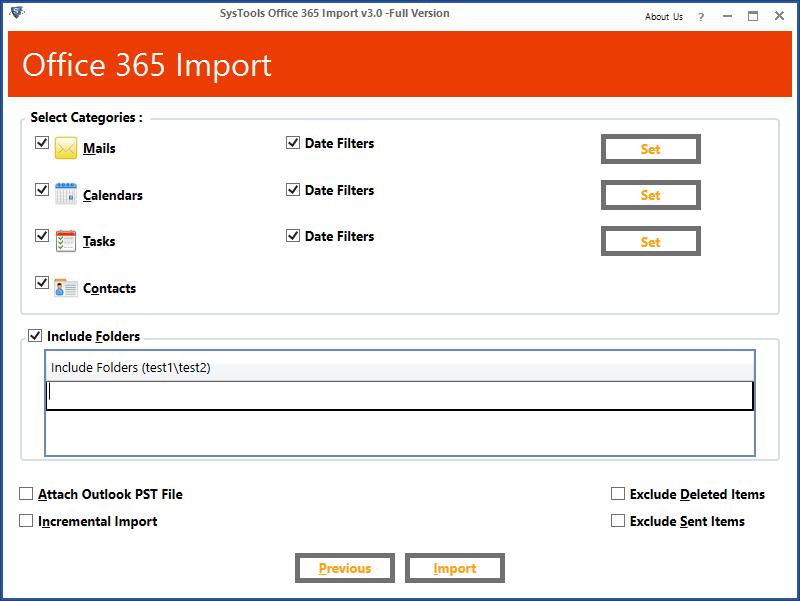
    Office 365 PST Import tool renders option of selective data migration, instead of migrating complete Outlook mailbox to Office 365 user account. It allows the user to perform category-wise migration. Also, it is capable to import all PST items like calendars, contacts to Office 365 account without Outlook. Moreover, one can apply date-range filters to perform selective conversion from Outlook PST to O365 mailbox and save lots of time.
  • export Selective Data
  • Option to Attach Outlook PST Files
    It is a foremost utility, which focused on the internal folder hierarchy also. This Office 365 Import software helps to preserve orientation of all items and folders of a source file when migrating PST file to O365 account. If the user enables this option, it will generate a new folder in Office 365 Webmail with original name of PST and retains the original file structure. This will help to avoid any confusion in accessing data when moving PST files to Office 365 Online.
  • Attach Outlook PST file
  • Exclude Deleted / Sent Items Folder
    Another impressive feature of this Office 365 Migration tool is that it let users avoid conversion of unnecessary folders. Thereby, if the user does not want to import sent items or deleted items folder from Outlook PST to Office 365, then he/ she needs to verify this option and proceed. In addition, this Office 365 Import software will not include both of these folders during Import procedure.
  • Provide Option to Include Folder
    During migration process, this Office 365 Import tool will let users export a specific folder from Outlook PST file. To avail these services, one just needs to check Include Folder option and identify the required folder location like : "test/name/sample". In this condition "sample" folder inside the "test" only folder will become imported to O365 Webmail. This feature is also helpful if users want to perform customized migration.

Versions of Office 365 Migration Tool

The Office 365 Import tool is available in two editions i.e., Free and Licensed Version. As per the need, users can select any one of the two editions:

  • Free Edition: The Office 365 migration tool is available on company’s official website. One can download and install the setup of tool for understanding the overall working of product. However, there is a limitation of this version that it will import only 25 items per folder from PST to O365.
  • Licensed Edition: It is the full or licensed version of O365 PST Import, which allow the users to migrate multiple Outlook PST files to Office 365. There is no such constraint imposed in this version of the software therefore, one can buy this product from official site and, perform Outlook to Office 365 migration easily.

Working Steps of Office 365 Import PST Tool

  1. Launch Office 365 PST migration tool on your system.
  2. Then, enter all valid credentials i.e., Office 365 ID and Password.
  3. Choose Add File (s) or Add Folder to import all PST files into Office 365 Mailbox.
  4. Next, you can Add Username and Password for individual user Account. This option is valid if Admin Account cannot be impersonated.
  5. Once the PST file is browsed, choose File Categories and apply Date-wise Filter Options.
  6. Finally, the software will migrate Outlook data to Office 365 successfully.

Pros & Cons of Office 365 PST Import Tool

Pros

  • Allows to migrate one or more Outlook PST files to Office 365 account.
  • Option to perform incremental import from save PST after first attempt.
  • Offers Date-wise filter to migrate selective items from PST to O365 Suite.

Cons

  • Software does not support Mac operating system.

Observational Verdict

After understanding the pros and cons of the tool, we can wind up with the fact that Office 365 Import PST tool is an all-rounder solution. It is programmed in such a manner to migrate Outlook PST file to Office 365 account in bulk. Also, it has a simple and interactive interface that even a novice user can understand its layout easily. Thus, it can be rated as 9.8/10 because it will not support Mac operating system. Besides this, there is no other negative point of this application and I can proudly say that there could not be any other software like this.

September 01, 2018

Why Should We Use OneDrive for Business – Top 11 Reasons

Use OneDrive for Business

Due to the adoption of cloud-based tools, people are working in a more effective and smart way. Organizations who are making use of Office 365 for their all business related chores, for them OneDrive for Business plays the most vital role. For both end users and cloud IT admins, OneDrive for Business is becoming one powerful solution as it offers additional capabilities to search for efficient ways to manage the big influx of data. Still, most of the users are unaware of the benefits related to OneDrive for Business. There are numerous capabilities that admin can implement or share with the end users to boost adoption and create power users. Therefore, in this blog, you will learn why to use OneDrive for Business. This will help the organizations to increase work productivity achha nhi lgg rha, alone feel and simplify the collaboration.

11 Reasons to Know Why Use OneDrive for Business

1. With OneDrive for Business Sync Tool Work Offline

With a cloud platform, the user can work from anywhere, on any device, at any time. But sometimes, the user does not have Internet access. Still, OneDrive allows the users to work offline. It offers a tool which helps the user to prevent the user’s Wi-Fi issues.

To work offline the user needs to download the OneDrive for Business sync app. Then he/she has to sign into Office 365 to navigate to OneDrive. Then the user has to search the library which he/she need to access offline and then press sync. The OneDrive for Business library allows the user to sync up to 20,000 files and folders.

The user can also pause or stop OneDrive for Business from syncing when he/she is having low bandwidth issues or accidentally began syncing process.

2. Gain Insight into Your Organization using Office Delve

Office Delve is the Microsoft’s new product, which allows the user to see what his/her colleagues are working on across Office 365. Delve integrates with the OneDrive so that the user can search and share documents with instant results. It acts as a project management tool and social media network all combined into one simple package.

Basically, Office Delve is powered by a technology called as Office Graph. It maps the relationships between people and content according to the Microsoft. Delve has a card-based interface which looks a lot like Pinterest. Each card is made up of documents and informational bites such as comments, likes, views, and tags which shows why and how each card is important. Cards are dynamic due to which the users are able to click and edit immediately. Moreover, one can also comment when the document is launched in Office 365.

3. Save Attachments Directly From Email to One Drive for Business

Many Office users spend much of their workday in sending and receiving files through Outlook. This is the benefit of the integrated file sync and share solution. It allows the user to connect to the applications that the user use most often such as Outlook.

The user can save the file attachments directly in OneDrive for the Business folder using Outlook Web App. Now, to save all the documents in an email, the user has to select Save to OneDrive or Save all to OneDrive. This will save the user documents to OneDrive folder called as Email Attachments. After that, you can easily move from folder to another folder within OneDrive or sent as cloud attachments.

To save a single attachment click on the down arrow and then select Save to OneDrive...BetterCloud

4. Check Out Your OneDrive for Business Storage Space

Now, the user can easily store a large amount of data in Office 365 as Microsoft has increased the cloud storage space available to Office 365 business subscribers from 25 GB to a full terabyte.

To check how much storage space is available to you, navigate to your Site settings page in One Drive for Business and then select Storage Metrics. Now, you will be able to see the allotted space remaining in the bar present in the upper right corner.

5. Enabling and Using Version Control

To stay up to date with the latest changes that are made by the user or his/her colleagues in the documents, Version Control is the best way.

To make use of Version Control, make sure that you are having version history enables in OneDrive for Business. To check it, select any file in the library and then click on Files > Version History. If this option is grayed out then you may need to contact your organization’s administrator to enable it.

Moreover, the Admins can also enable or remove version control from the complete list or the library. Version control settings can be configured to save a new version every time editing is done, depending on the importance of the document.

Once the user has enabled the version control, he/she can view, restore, or delete an earlier version of the document.

6. Configure Links to OneDrive for Business in Your SharePoint

Admins whose organizations are using both SharePoint 2010 and OneDrive for Business this option is good for them. As an admin, the user can set up a link that appears in his/her organization’s SharePoint. This will send users directly to their OneDrive for Business account.

After configuring links to OneDrive for Business in your SharePoint, it will become easy for the end users to navigate from SharePoint to OneDrive for Business.

7. OneDrive for Business on Your Mobile Device

Now, the organizations that use OneDrive for Business can access it on Windows Phone, Android and Apple devices. These apps are designed for ongoing working thus, they are not as efficient and powerful as their web-based or desktop counterparts. However, they have some inherent capabilities which are beneficial on these devices.

With Android devices, the user can pin folders to the home screen for quick access. For this, the user first has to download the OneDrive app on the Android device. After that, tap and hold on a blank space of the home screen and then select OneDrive. Now, he/she will be prompted to select a folder to pin it to your home screen. For enhanced security while accessing OneDrive account set up a PIN or use iOS TouchID.

8. Create and Host an Online Survey

The user can also create a survey with Excel Online, this helps the user to poll a group of friends on various things such as vacation destination preferences etc.

  • In OneDrive: Click Create > Excel Survey
  • In OneDrive for Business: Click New > Excel Survey

Note: Only personal OneDrive users can follow the next three tips. These tips are not available in OneDrive for Business.

9. Access your Other PC’s through OneDrive

Cloud allows the user to access the documents from anywhere, but OneDrive for Windows permits the user to access their other PCs. Even if the files are not in the user’s OneDrive folders then also he/she can access his/her PC’s through OneDrive. To access documents on other PC’s, the user needs to enable the Fetch Files feature.

10. Embed an Office Document in a Webpage

Would you like to share your PowerPoint or Word document with the readers? No issues, you can take advantage of OneDrive which allows the user to embed documents directly on his/her website or blog. The user just has to check the box next to the name of the document which you want to embed. After that, right click and select the Embed option. Now, select Generate to generate the HTML code. The user can use this HTML code to embed the document into his/her site.

11. Use IFTTT for OneDrive

If This Then That or IFTTT is a tool that automates tasks in the user’s everyday life. The user can connect to IFTTT to OneDrive and make multiple tasks easier.

  • Upload all the new iOS photos to OneDrive
  • Archive incoming attachments from Gmail to OneDrive
  • Upload all new Flickr photos the user post to OneDrive

Summing Up

There are numerous organizations that are migrating to Office 365, OneDrive for Business as it is important for the end users and admin. OneDrive for Business offers various management capabilities. To improve the collaboration and productivity, it is necessary for the admin to take full advantages of it. Thus, in the above section, we have explained different OneDrive for Business tips that will help the users to boost adoption and create power users.