September 03, 2018

How to Create Office 365 Email Signatures Centrally – Step by Step

How to Create Office 365 Email Signatures

An email signature plays an essential role in marketing, personal branding, and online visual identity. It can be considered as almost like a digital business card that is simple and small. The email signature conveys a professional image, serves as a free marketing tool for everyone you are connecting or responding, and makes it easier for others to get in contact with you. Today, most of the organizations and users are utilizing Office 365 and they want to append the digital signature in each email message to prove their authenticity. However, there are several users who do not know that how to create automatic signature in Office 365/ Exchange Online. In order to help users in performing such task easily, we have come up with this editorial. Here, we will disclose the manual technique of adding an automated email signature in Office 365. So, let’s begin.

Picture This Out!

Before proceeding further with the solution to create auto signatures centrally in Office 365, have a look at the following query. This query was asked by an Office 365 user who wants to create an email signature in Office 365.

“I want to add an email signature of few lines in the text format that is placed at the bottom of all the outgoing emails of my Office 365 account. This email signature will include my name, company, website, contact number and a short elevator pitch or you can say my favorite quote. So that, I can use this for sharing my essential contact information and advertise myself both. However, I do not have any idea about how to create auto signatures centrally in Office 365. So, is there any expert who can suggest a solution for the same?”

Guidelines to Set Up Auto Email Signature in Office 365

The Office 365 or Exchange Online is capable to automatically add text/ HTML or even image signatures. Below are the steps for this:

  • First, log in to office.com with your office365 account.
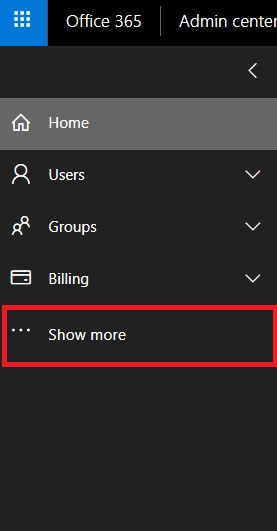
  • Next, click the dots/ App launcher icon on the top left corner and choose Admin option.
  • Click on Show more menu from the left sidebar.
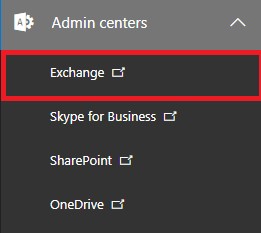
  • Expand the Admin centers options and choose Exchange to navigate to the Exchange admin center.
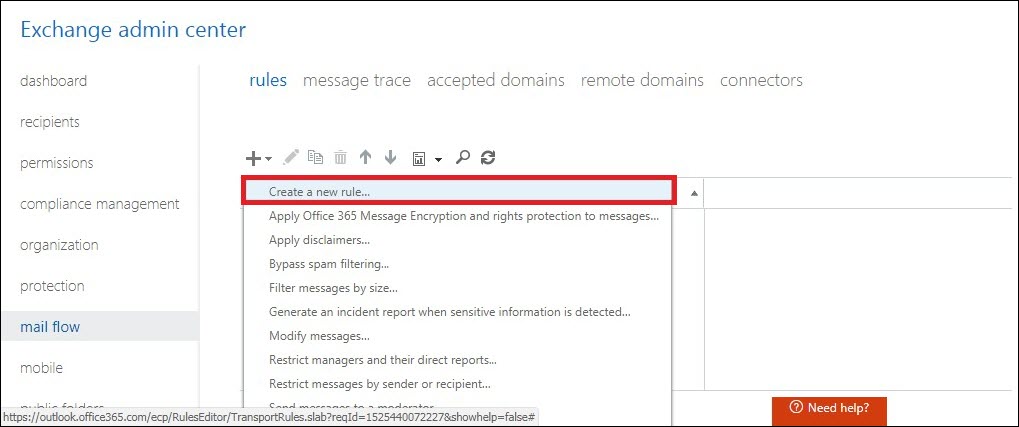
  • Select mail flow and click on Add (+) icon, select Create a new rule.
  • In the ‘new rule’ dialog box:
  • Type a name for the new rule
    • Select Apply to all messages option in Apply this rule if… section
    • Select Append the disclaimer… in Do the following… option
    • Click on Select one… alternative and choose wrap option from the specifed fallback action wizard that prompts
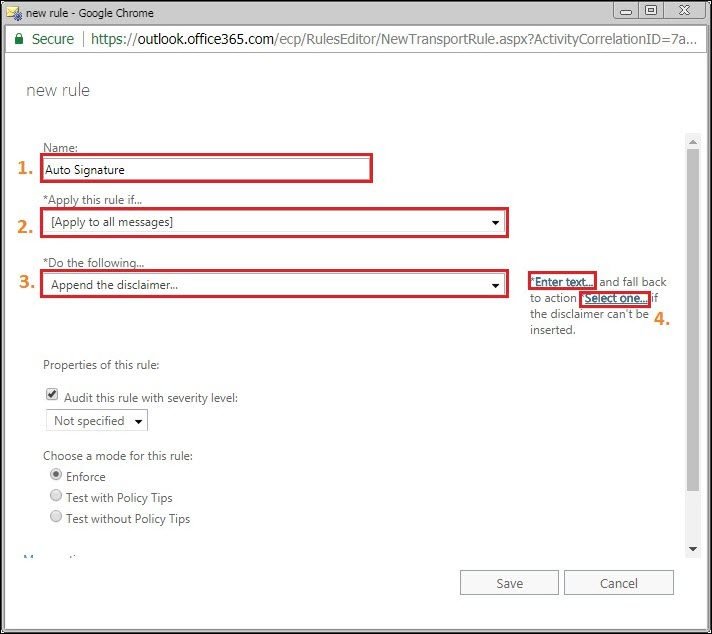
  • Choose Enter text.. option and the key in your desired signature

  • Note: This field also supports the HTML tags so make sure to use of that
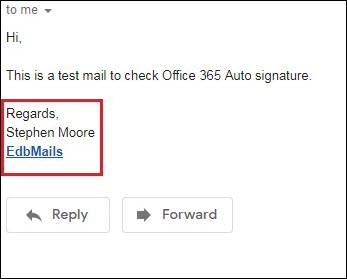
  • To verify the done procedure, send a test mail and check if it works

The Technical Challenge

As the in-built email signature editor is such a handy tool however, it includes some limitations. Such as:

  • You CANNOT place an email signature under the reply.
  • You CANNOT test the email signatures in advance.
  • You CANNOT prevent images from being blocked.
  • You CANNOT append side banners to messages.
  • You CANNOT see the signatures in Sent Items.
  • You CANNOT remove signaling phrases next to the empty Active Directory fields.
  • You CANNOT force email format to be available.

Concluding Lines

Signatures have radically developed and are being utilized by the whole of our civilization. This is a great way to personalize email messages or meet the regulatory compliances with all legal disclaimers. Thus, for users who are searching the solution for how to create auto signatures centrally in Office 365 / Exchange Online, this article provides a simple as well as an effective solution. Executing guidelines sequentially will enable automatic signatures on all the Outgoing emails in Office 365.

September 01, 2018

Why Should We Use OneDrive for Business – Top 11 Reasons

Use OneDrive for Business

Due to the adoption of cloud-based tools, people are working in a more effective and smart way. Organizations who are making use of Office 365 for their all business related chores, for them OneDrive for Business plays the most vital role. For both end users and cloud IT admins, OneDrive for Business is becoming one powerful solution as it offers additional capabilities to search for efficient ways to manage the big influx of data. Still, most of the users are unaware of the benefits related to OneDrive for Business. There are numerous capabilities that admin can implement or share with the end users to boost adoption and create power users. Therefore, in this blog, you will learn why to use OneDrive for Business. This will help the organizations to increase work productivity achha nhi lgg rha, alone feel and simplify the collaboration.

11 Reasons to Know Why Use OneDrive for Business

1. With OneDrive for Business Sync Tool Work Offline

With a cloud platform, the user can work from anywhere, on any device, at any time. But sometimes, the user does not have Internet access. Still, OneDrive allows the users to work offline. It offers a tool which helps the user to prevent the user’s Wi-Fi issues.

To work offline the user needs to download the OneDrive for Business sync app. Then he/she has to sign into Office 365 to navigate to OneDrive. Then the user has to search the library which he/she need to access offline and then press sync. The OneDrive for Business library allows the user to sync up to 20,000 files and folders.

The user can also pause or stop OneDrive for Business from syncing when he/she is having low bandwidth issues or accidentally began syncing process.

2. Gain Insight into Your Organization using Office Delve

Office Delve is the Microsoft’s new product, which allows the user to see what his/her colleagues are working on across Office 365. Delve integrates with the OneDrive so that the user can search and share documents with instant results. It acts as a project management tool and social media network all combined into one simple package.

Basically, Office Delve is powered by a technology called as Office Graph. It maps the relationships between people and content according to the Microsoft. Delve has a card-based interface which looks a lot like Pinterest. Each card is made up of documents and informational bites such as comments, likes, views, and tags which shows why and how each card is important. Cards are dynamic due to which the users are able to click and edit immediately. Moreover, one can also comment when the document is launched in Office 365.

3. Save Attachments Directly From Email to One Drive for Business

Many Office users spend much of their workday in sending and receiving files through Outlook. This is the benefit of the integrated file sync and share solution. It allows the user to connect to the applications that the user use most often such as Outlook.

The user can save the file attachments directly in OneDrive for the Business folder using Outlook Web App. Now, to save all the documents in an email, the user has to select Save to OneDrive or Save all to OneDrive. This will save the user documents to OneDrive folder called as Email Attachments. After that, you can easily move from folder to another folder within OneDrive or sent as cloud attachments.

To save a single attachment click on the down arrow and then select Save to OneDrive...BetterCloud

4. Check Out Your OneDrive for Business Storage Space

Now, the user can easily store a large amount of data in Office 365 as Microsoft has increased the cloud storage space available to Office 365 business subscribers from 25 GB to a full terabyte.

To check how much storage space is available to you, navigate to your Site settings page in One Drive for Business and then select Storage Metrics. Now, you will be able to see the allotted space remaining in the bar present in the upper right corner.

5. Enabling and Using Version Control

To stay up to date with the latest changes that are made by the user or his/her colleagues in the documents, Version Control is the best way.

To make use of Version Control, make sure that you are having version history enables in OneDrive for Business. To check it, select any file in the library and then click on Files > Version History. If this option is grayed out then you may need to contact your organization’s administrator to enable it.

Moreover, the Admins can also enable or remove version control from the complete list or the library. Version control settings can be configured to save a new version every time editing is done, depending on the importance of the document.

Once the user has enabled the version control, he/she can view, restore, or delete an earlier version of the document.

6. Configure Links to OneDrive for Business in Your SharePoint

Admins whose organizations are using both SharePoint 2010 and OneDrive for Business this option is good for them. As an admin, the user can set up a link that appears in his/her organization’s SharePoint. This will send users directly to their OneDrive for Business account.

After configuring links to OneDrive for Business in your SharePoint, it will become easy for the end users to navigate from SharePoint to OneDrive for Business.

7. OneDrive for Business on Your Mobile Device

Now, the organizations that use OneDrive for Business can access it on Windows Phone, Android and Apple devices. These apps are designed for ongoing working thus, they are not as efficient and powerful as their web-based or desktop counterparts. However, they have some inherent capabilities which are beneficial on these devices.

With Android devices, the user can pin folders to the home screen for quick access. For this, the user first has to download the OneDrive app on the Android device. After that, tap and hold on a blank space of the home screen and then select OneDrive. Now, he/she will be prompted to select a folder to pin it to your home screen. For enhanced security while accessing OneDrive account set up a PIN or use iOS TouchID.

8. Create and Host an Online Survey

The user can also create a survey with Excel Online, this helps the user to poll a group of friends on various things such as vacation destination preferences etc.

  • In OneDrive: Click Create > Excel Survey
  • In OneDrive for Business: Click New > Excel Survey

Note: Only personal OneDrive users can follow the next three tips. These tips are not available in OneDrive for Business.

9. Access your Other PC’s through OneDrive

Cloud allows the user to access the documents from anywhere, but OneDrive for Windows permits the user to access their other PCs. Even if the files are not in the user’s OneDrive folders then also he/she can access his/her PC’s through OneDrive. To access documents on other PC’s, the user needs to enable the Fetch Files feature.

10. Embed an Office Document in a Webpage

Would you like to share your PowerPoint or Word document with the readers? No issues, you can take advantage of OneDrive which allows the user to embed documents directly on his/her website or blog. The user just has to check the box next to the name of the document which you want to embed. After that, right click and select the Embed option. Now, select Generate to generate the HTML code. The user can use this HTML code to embed the document into his/her site.

11. Use IFTTT for OneDrive

If This Then That or IFTTT is a tool that automates tasks in the user’s everyday life. The user can connect to IFTTT to OneDrive and make multiple tasks easier.

  • Upload all the new iOS photos to OneDrive
  • Archive incoming attachments from Gmail to OneDrive
  • Upload all new Flickr photos the user post to OneDrive

Summing Up

There are numerous organizations that are migrating to Office 365, OneDrive for Business as it is important for the end users and admin. OneDrive for Business offers various management capabilities. To improve the collaboration and productivity, it is necessary for the admin to take full advantages of it. Thus, in the above section, we have explained different OneDrive for Business tips that will help the users to boost adoption and create power users.

August 30, 2018

Split Oversized PST File by PST Splitter Full Version Safely

Split Oversized PST File

It is very obvious fact that managing large size data on local machine is quite difficult task, generally when it is about storage of email data files. Normal computer users like me becomes tensed when they find that maximum amount of machine hard drive storage space is getting occupied by email file formats. One such file format is PST file, which is generated from Outlook email application and is used for storage of its data items. The size of this file increases with daily receiving of new mails in Outlook or due to some additional information, inserted by users. Therefore, in order to handle oversized PST files in an error-free way, one should regularly create multiple PST files by truncating Outlook storage files.

Now a question arises that how to split oversized PST file into smaller parts without affecting the original data integrity? Then, the appropriate answer to this question is Split PST software, which provides functionality to split PST file size, date, folder and by year. In the following section, I am going to tell readers my personal point of view regarding the PST splitter tool.

About Split PST Software

The PST splitter is the best tool to split oversized PST files for all Outlook users who want to divide large PST file into smaller parts. The tool renders four different options to cut PST file i.e., truncate PST file by size, divide PST by date, split large PST by Year, and separate Outlook file on basis of folder. No matter whether one is using an older operating system or a latest one, the application gives its 100% result on all platform in all aspects like working speed, conversion rate, perfection, etc. There is no risk of any data loss when tool is cutting a PST file into two.

Split PST Software Overview

Software Function Truncate large PST files on basis of Date, Year, Size, and folder
Product Version 4.2
Size of the Tool 7.4 MB
Prerequisites Microsoft Outlook should be installed and successfully configured
Windows Compatibility Compatible with 10, 8.1, 8, 7, and all below versions
Microsoft Outlook Supportable with all editions of Outlook, including 2016

Astonishing Features of PST Splitter

  • Provides 4 Options To Divide PST File: The product renders functionality to split PST file on basis of following four options:
    • By Date
    • By Folder
    • By Size
    • By Year
  • Equips Work to Divide Archive PST file: Split PST software is capable of separating entire mailbox items of the Outlook file i.e., emails, address book, tasks, calendars, etc. In addition to this, users can break archive.pst file or folder by choosing option of cutting Outlook data archive file to manage it easily after importing files back in MS Outlook.
  • Fix Corruption Due to Oversized PST File: The application is an error-free means to overcome all the errors, which causes corruption in PST file due to exceed in size limit. In order to keep PST file safe from getting it damaged or corrupted, one needs to manage large Outlook PST files by regularly cutting them with help of this application.
  • Option to Choose Outlook Version for File: One need to choose the version of source PST file from which it is generated. The PST Splitter software is capable of supporting ANSI as well as UNICODE PST file, which means that tool is comfortable with all versions of Outlook i.e., 2016, 2013, and below ones.

Editions and Extents of the Splitter

Developers of Split PST software had provided dual editions i.e., Trial edition and purchased editions. The explanation of both these editions is given below:

  • Free Version
    In this version, one just need to download setup.exe file of PST Splitter from the official site of the organization and then install it. However, there is restriction in free version of the tool that it only splits first 50 emails of the source file and if users have chosen Folder option for splitting then, program will only be able to split 10 emails from each folder.
  • Purchased Version
    In order to enjoy working of our Split PST product without any limitation, users can purchase online the licensed version. The entire payment work will be conducted online, ensuring users that there will be no fraud while performing the transaction.

Pros & Cons

Pros

  • Provides four independent options to truncate PST file.
  • Feature to split archive PST file without any data loss.
  • No file size restriction for source Outlook data file.
  • Divide PST file with all items like emails, tasks, etc.

Cons

  • Requires Microsoft Outlook installation for working.
  • Does not provide option to split corrupted PST file.

Time to Conclude

Based upon functionality of the software, I would like to rate this product 8.5/10 because it requires Outlook for its working. However, the relief point is that it is not mandatory to have an account to be configured in Outlook for functioning. Apart from this, all other features are perfectly created by the developers and I highly recommend users to truncate Outlook 2016, 2013, 2010, etc., data file with help of this Split PST software.

August 27, 2018

How to Get Rid Off of Outlook Stuck in Offline Mode Issue

Outlook Stuck in Offline Mode

Microsoft Outlook is the proficient email client that has reached the height of popularity. It is the top most choice for any business user. Therefore, being a widely used email client, users expect Outlook to work without any issue. But in some cases, users encounter problems while working on Outlook. One of the rarest problem faced by the users is Outlook stuck in offline mode and users are unable to get back online and receive emails.

However, when a user restarts the Outlook and have an active internet connection, nothing works and Outlook remains in some state. In the worst situation, the work offline button also get greyed out. Thus, to get Outlook back in the normal functioning state, a user needs to fix this issue as soon as possible.

Consider the following queries asked by the users:

“I am an Outlook user and shared lots of emails with my clients on daily basis. Daily I open Outlook on my laptop and receives emails automatically. Now, I have to click on the Send/ Receive button every time I want to receive an email. I do not know, how I can fix this issue. What is the exact problem behind this? Can anyone out there tell me why my Outlook 2007 stuck in offline mode?”

“Hello, I am using MS Outlook 2016 from many years and everything was running fine until last night. I just got a message from a colleague that he has sent me one report. I opened Outlook and tried to check new emails but unable to receive any new messages. After that, I checked Outlook was in offline mode and I changed it to online mode. But the problem is still the same, I do not know what has exactly happened. Any suggestions?”

How to Fix Outlook Stuck in Offline Mode Issue Manually?

Case #1:

If Outlook profile of any user stuck in an offline mode, then he or she needs to check whether Outlook is working in online mode or offline mode. And, for the same, a user needs to look at the lower right corner of the screen. If it is connected with Exchange Server, then it displays Connected to Exchange Server or Online depending upon the version of Outlook.

Now, if Outlook is working in Offline mode, then it needs to be fixed. And, for that, you just have to click on the arrow right of “Offline” and simply uncheck the “Work Offline” option.

Case #2:

Another possible case could be that the Exchange account is not being in the “Cached mode”. Thus, one must enable it by following the simple steps mentioned below:

  1. First of all, press Window key from the keyboard.
  2. After that, type Mail in the Search box and hit Enter key.
  3. Then, click on the E-mail Accounts button.
  4. Next, you have to double-click on your Exchange account.
  5. At last, check Use Cached Exchange Mode option.
  6. In Outlook 2013, click on More Settings button >> Advanced tab and then enable this option.
  7. Finally, click on the Close button.

After following the above steps, a user may need to close and reopen the Outlook application to get on with the email activities.

Closing Words

When a user is unable to send or receive a new message from Outlook, it becomes a serious problem. It generally happens when Outlook stuck in offline mode. However, the main issue behind this is that either there is a poor internet connection or some issue with Exchange Server. Thus, it is important to fix this issue as soon as possible and let Outlook work normally as before.

June 27, 2018

5 Most Common Outlook Issues and Solutions - Perfect Troubleshoot


Outlook Common Errors and Solutions

Outlook is the most widely used Email client all over the world. The reason behind this is the easy-to-use interface and advanced features of Outlook. But it has some glitches or error also. Some errors in MS Outlook arises out of nowhere. These errors can be a trouble for the user as they are difficult to resolve. Some most common Outlook issues are:

  • Outlook not responding.
  • Inactive or Sluggish working.
  • Issues with profile handling.
  • PST corruption.
  • Outlook crashes unexpectedly.

And many more. We will study about the causes and solutions for these Outlook common errors. Follow the article till the end to find the solution of the above-listed 5 common Outlook issues.

Some Common Reasons Behind Errors in Microsoft Outlook

There can be many reasons for a single error in Outlook. But some of the main causes can be as follows:

  • Sudden power failures
  • Corrupted PST file
  • Virus attack on your system
  • Using old version of Outlook
  • Incorrect configuration of Outlook

Many times these are the causes through which Outlook error arises. But as I said there is not a single cause responsible for an error, there can be many other reasons.

Common Microsoft Outlook Issues - Reasons & Solutions

1) Sluggish or Inactive Outlook Performance

If a user is using Outlook from a long time, then he/ she must be familiar to this error. Over a period of time email, entries, calendar etc., keeps on piling in Outlook and its size increases abnormally large. After a point of time, the size reaches its limit and results in slow working of Outlook.

Solution: A user can simply starve the PST file. Delete all unwanted emails that are larger than 100 KB. If there is an important email, then store it in disk and clear the PST and clear all trash.

2) Outlook Crashes Unexpectedly

Sometimes the things which are meant to help us itself causes trouble for us. There are many Outlook add-ins which are designed to help us and make Outlook easier. But sometimes these Outlook add-ins itself get corrupted and generates an error.

3) Outlook PST is Not a Personal File Error

There can be various possible reasons behind this error like corruption in PST, sudden power failure, PST file is marked as “read-only” attribute or it is saved in CD.

Solution: To fix this error you have to follow the following steps:

  • First of all, move your PST file from CD to the hard drive.
  • After this, uncheck the “Read Only” attribute by going in its Properties

4) Your Are Sending Spam Mails

Many of your friends may have tell you that they are getting unwanted or spam mails from you. And this all happens without your knowledge. This could be dangerous if the receiver is a business associate and the mail is irrelevant The reason behind this error can be a malware in your computer system that has access to your email address. And, the other possible reason is that your mail account is hacked.

Solution: To fix this error you can just simply change your email password. But in some cases a user is not able to change the password, then you have to report this issue to Support team immediately. You can also run an anti-virus to scan your system and remove the malware.

5) Unable to Start MS Outlook

According to many experts, corrupted PST file or corrupted navigation pane settings is the reason behind cannot start Microsoft Outlook error. Whenever you see a file with a name like, file_name.xml and its size is zero it means the file is corrupted.

Solution: Follow the below-mentioned steps to fix this error:

  1. First of all, go to Start >> type Outlook.exe /safe in search box.
  2. Then remove all the add-ins

NOTE: To disable all the add-ins follow the following steps:

  1. Choose file Tab >> Options >> Add-Ins >> select Com Add-Ins.
  2. Now, click on Go option >> clear all the choices in the list box
  3. Then, click on OK button and restart Outlook.

Expert Solution to Fix Common Outlook Errors

The above mentioned solutions may have some limitations but the solution which I am going to tell you overcome all the limitations of above method. Experts suggests the users to use a third-party tool to fix the all above errors. The most widely used third party tool is Outlook Recovery tool. With the help of this tool a user can solve any Outlook error with in minutes. Key features of this tool.

  1. Recovers permanently deleted Outlook emails.
  2. Repair damaged PST file in Outlook.
  3. Repair multiple PST Files in Batch Mode.
  4. No PST File Size Limitations Imposed.
  5. Recover Password protected corrupted Outlook PST files.
  6. Repair & Recover deleted Outlook PST Data items.

Wrapping Up

Any small error in Outlook can create big trouble for the users. It might lead to inaccessibility of mailbox data, which break the continuity of the work. Thus, in this post, 5 common Outlook issues faced by a user are covered with respective solutions. These methods will surely solve the Outlook common errors. In addition, one can also use SysTools Outlook Recovery for better results.