How to Create Office 365 Email Signatures Centrally – Step by Step
An email signature plays an essential role in marketing, personal branding, and online visual identity. It can be considered as almost like a digital business card that is simple and small. The email signature conveys a professional image, serves as a free marketing tool for everyone you are connecting or responding, and makes it easier for others to get in contact with you. Today, most of the organizations and users are utilizing Office 365 and they want to append the digital signature in each email message to prove their authenticity. However, there are several users who do not know that how to create automatic signature in Office 365/ Exchange Online. In order to help users in performing such task easily, we have come up with this editorial. Here, we will disclose the manual technique of adding an automated email signature in Office 365. So, let’s begin.
Picture This Out!
Before proceeding further with the solution to create auto signatures centrally in Office 365, have a look at the following query. This query was asked by an Office 365 user who wants to create an email signature in Office 365.
“I want to add an email signature of few lines in the text format that is placed at the bottom of all the outgoing emails of my Office 365 account. This email signature will include my name, company, website, contact number and a short elevator pitch or you can say my favorite quote. So that, I can use this for sharing my essential contact information and advertise myself both. However, I do not have any idea about how to create auto signatures centrally in Office 365. So, is there any expert who can suggest a solution for the same?”
Guidelines to Set Up Auto Email Signature in Office 365
The Office 365 or Exchange Online is capable to automatically add text/ HTML or even image signatures. Below are the steps for this:
- First, log in to office.com with your office365 account.
- Next, click the dots/ App launcher icon on the top left corner and choose Admin option.
- Click on Show more menu from the left sidebar.
- Expand the Admin centers options and choose Exchange to navigate to the Exchange admin center.
- Select mail flow and click on Add (+) icon, select Create a new rule.
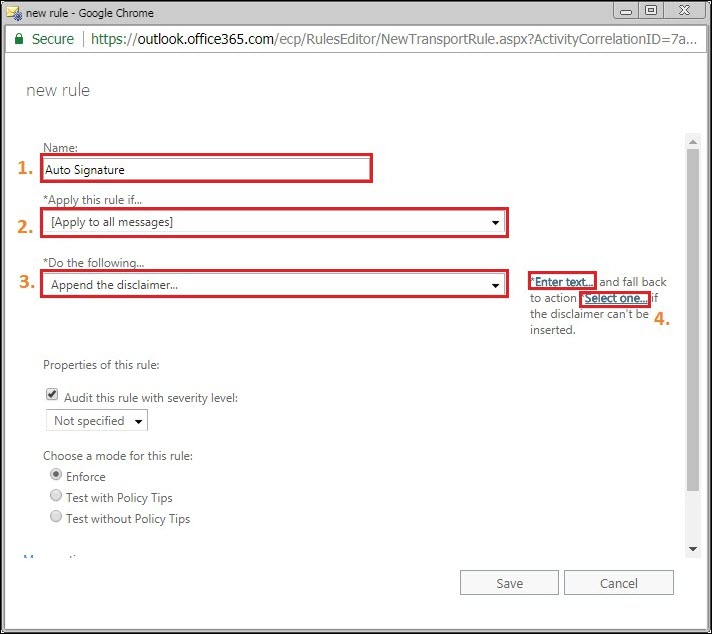
- In the ‘new rule’ dialog box:
- Type a name for the new rule
- Select Apply to all messages option in Apply this rule if… section
- Select Append the disclaimer… in Do the following… option
- Click on Select one… alternative and choose wrap option from the specifed fallback action wizard that prompts
- Choose Enter text.. option and the key in your desired signature
- To verify the done procedure, send a test mail and check if it works
Note: This field also supports the HTML tags so make sure to use of that
The Technical Challenge
As the in-built email signature editor is such a handy tool however, it includes some limitations. Such as:
- You CANNOT place an email signature under the reply.
- You CANNOT test the email signatures in advance.
- You CANNOT prevent images from being blocked.
- You CANNOT append side banners to messages.
- You CANNOT see the signatures in Sent Items.
- You CANNOT remove signaling phrases next to the empty Active Directory fields.
- You CANNOT force email format to be available.
Concluding Lines
Signatures have radically developed and are being utilized by the whole of our civilization. This is a great way to personalize email messages or meet the regulatory compliances with all legal disclaimers. Thus, for users who are searching the solution for how to create auto signatures centrally in Office 365 / Exchange Online, this article provides a simple as well as an effective solution. Executing guidelines sequentially will enable automatic signatures on all the Outgoing emails in Office 365.


